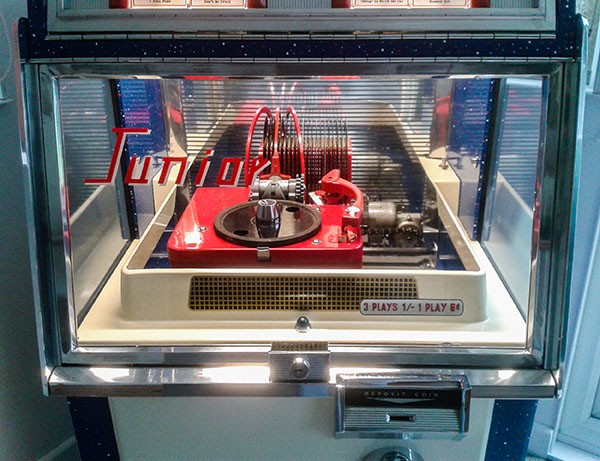
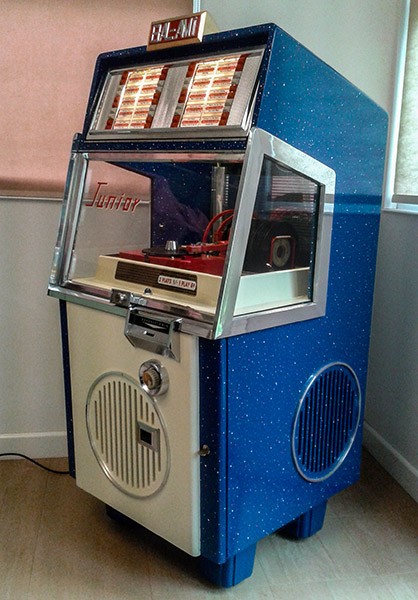
Restored Junior with Spots !
This Junior has been fully restored by Dave Loosemore, a retired engineer.
 Here's the story of the restoration in Dave's words:
I designed and built aircraft accessories for 30 years and I have restored a number of cars over the years. I was getting sick of rust and too old to go crawling on a concrete floor so I looked for something else to keep me out of mischief, and jukeboxes looked ideal. I have always been fascinated by them, but the last time I was up close to a jukebox was in the early 60's, but at that time I was feeding it with sixpences and giving it the occasional kick.
After a year or so of research I picked a Junior as the best one to start with. It had all the major requirements, i.e. electro-mechanical (no digits), a visible mechanism, small enough to get in the house, and a valve amplifier. I purchased this one in November 2013 from Dave Armstrong in Folkestone. He turned out to be a leading light in the jukebox world, he still had about eight, and was a great friend of Tony Holmes. Dave was very helpful and supportive, I was lucky to have picked this one.
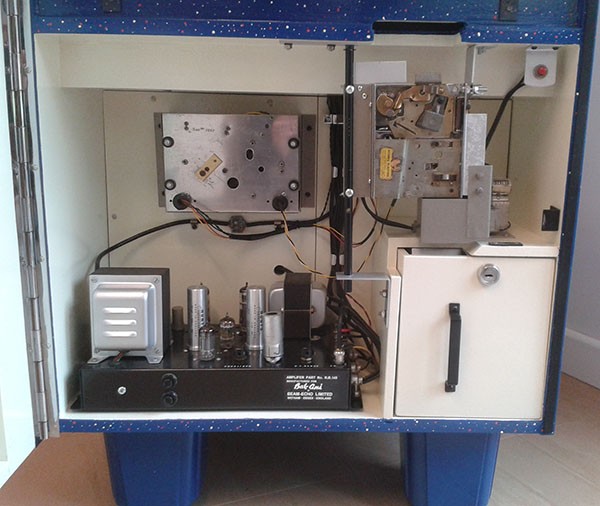
The jukebox was in a bit of a state but more or less all there. The floor of the cabinet was a write off - damp, rot and woodworm - and had to be completely replaced. The mechanism was all there and just needed a full strip and overhaul, The speakers had never been touched, all the woodscrews were rusted solid, but when I did eventually get into the box I found the speakers in good condition. The amplifier was rusty and had been butchered, this was a start-again job, welding up the holes, and rebuilding. Andy Barter was very helpful here. (I used to build these when I was a lad for the school pop groups !). Simon Edy was a great help too, the title strip windows were from some he had specially made, and he gave me lots of info. The slug rejector was a total strip job and took a lot of time, also true of the credit unit. The idea was to keep me occupied and out of mischief, and that it certainly did, also to keep the brain cells working now that I am retired.
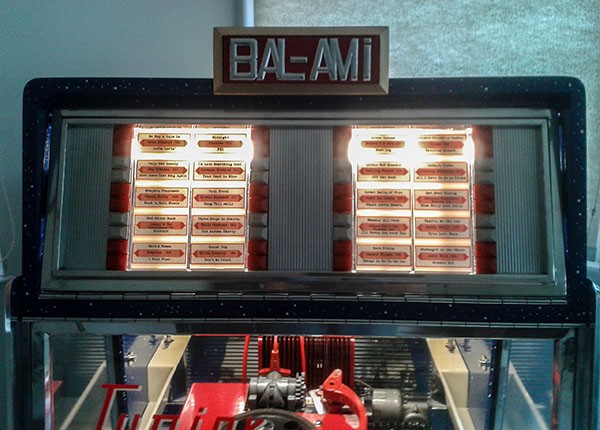
My daughter told me of a shop near her that has BAL-AMi's in the window. I investigated and found a Junior and a J200 with NOT FOR SALE on them. It is a company that rents out gaming machines etc, the jukeboxes were window dressing. The man who owns it was very helpful and let me photo the unmolested Junior any time I wanted. He explained that the company started after the war and some of their first jukeboxes were Juniors. The J200 was one of the later BAL-AMi's they bought (it's in lovely original condition). He said they had the contract to supply the NAAFI's which was a licence to print money. He says he remembers hosing off the nicotine in the yard when they came back for servicing !! He also told me how they sold off the jukeboxes when they went out of fashion, including lots of Continentals at £300 each !! Happy days.
Dave A. found me any missing parts, and I fabricated the rest. It took about a year with support from Simon and Andy, and my brother with his lathe. Access to an unmolested Junior in Hampshire also proved very helpful - many photos were taken so that I could see what went where.
My intention was to restore it to as close as I could get it to how it looked when it left the factory. I think the turntable was from another model, but the chrome boss added a bit of extra bling, so I kept that. Apart from re-chroming I did all the work myself, and I finished it just in time to play "Merry Xmas Everybody" by Slade for the Christmas of 2014, a challenge my neighbour had set!
Dave also had some fun applying the painted specs on the cabinet.................
First Attempt:
My intention was to restore my BAL-AMi Junior to a condition that was as close as possible to the original, this includes the bumpy finish on the cabinet, and the spots. The bumpy finish was achieved by using a paint roller, an idea I pinched from Simon Edy, but the spots proved much more difficult to achieve.
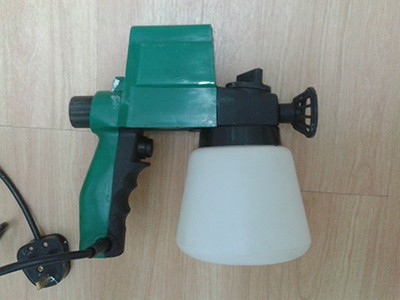 Way back in the early 1960’s I had my first attempt to spray a car. I had obtained a Burgess Electric Vibrating Sprayer, but this machine and I did not get on. It produced every finish you can imagine except the one I wanted, but as I remember one of the finishes it did produce was spots! My attempts to find one of these sprayers proved fruitless but at a boot sale I did find a modern version, which was intended to spray fences. This worked well and produced quite a good finish, which this time was not what I wanted!! After some modifications, spots were produced, in vast quantities, and at about 10 ft from the sprayer. It would have sprayed the whole cabinet in 20 seconds flat! So this first attempt was ruled out as uncontrollable, and messy.
Second Attempt:
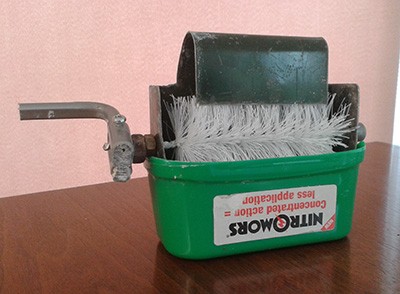
My wife is an artist, when she wants spots on her paintings she uses a toothbrush flicking the paint off with her finger nail. This works very well but clearly would take for ever to do a whole cabinet. This technique needed automation. So a rotary version was built. The photo shows the prototype made from a bottle brush, a Nitromors lid to hold the paint and a piece of bent steel. The Flick-o-Matic Mk I was born!! After some practice it worked, rather well actually. It was however very messy, difficult to control and awkward to use in restricted spaces. But it worked. So the second attempt was a partial success.
Third Attempt:
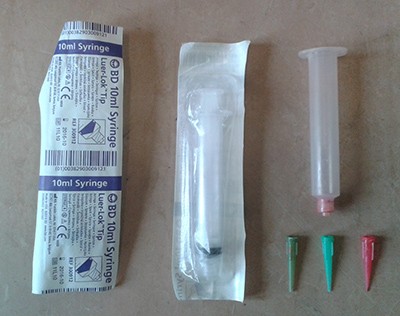
Geoff, an old work colleague came round to see progress to date. After an inspection of the previous attempts at spots his suggestion was that I put them on one at a time! This he thought would take ages but as I was now retired and obviously had plenty of time on my hands this shouldn’t pose a problem. He was joking, I think, but I ruminated on this idea for some time, it would be utterly controllable and should be less messy, perhaps it was worth trying. After a few false starts I came up with a method of dobbing the spots on like a demented bingo player, which was quite quick and accurate. The dobbing tool was a 10ml syringe with the plunger removed completely, to contain the paint. The nozzles were plastic ”needles“ also found on e-bay and after some practice, three sizes were selected to give three different size spots.
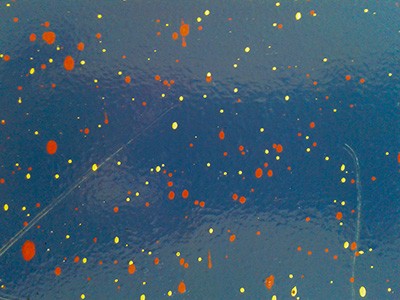
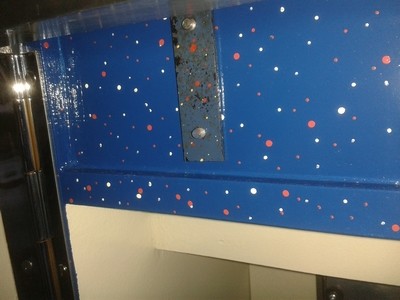
 I used two syringes, one with red paint and one with cream. I had to concentrate to keep the spots random, and I only added a few of the larger ones. This obviously only works on to a horizontal surface so I had to turn the cabinet over several times waiting for the paint to set properly each time. The results were amazing. I had very authentic looking spots, and very little mess. The photos show a part of the original cabinet, and the same area after restoration. So it was third time lucky, thanks Geoff, even if you were joking !
Before:
 After:
Perhaps a better comparison, in the following photo the bracket was left untouched.
My thanks to Dave for a fantastic article and a wonderful restoration !
